What are consumables
Consumables are a type of in-app purchase that can be used within your app or game; by used, I mean, for example, coin, food, life-force, credit; anything that can be bought and then the same item be bought again. This is opposed to durables, which are in-app purchases, such as removing adverts, premium features, etc.
Where to go first
The MSDN article does cover most of what you need. However, it doesn’t seem to cover everything, hence this post.
The documentation for the CurrentAppSimulator is also useful.
The Principle
Actual purchasing is done through the CurrentApp class. However, there is an identical test version of this, which simulates the purchasing of in-app products. Part of the store certification process is to ensure you haven’t forgotten to switch these to their live counterparts; although using the #Debug and #Release configurations might be an idea, too (see the bottom of this post for more details on this).
Step 1 - WindowsStoreProxy.xml
When you run your application in real life, it will download the purchase information from the store. However, when you’re testing, you need to simulate this. The linked documents do have examples; however, IMHO, they don’t completely explain the implications of each section. Here’s an XML file:
<?xml version="1.0" encoding="utf-16" ?>
<CurrentApp>
  <ListingInformation>
    <App>
      <AppId>988b90e4-5d4d-4dea-99d0-e423e414ffbc</AppId>
      <LinkUri>http://apps.windows.microsoft.com/app/988b90e4-5d4d-4dea-99d0-e423e414ffbc</LinkUri>
      <CurrentMarket>en-gb</CurrentMarket>
      <AgeRating>12</AgeRating>
      <MarketData xml:lang="en-gb">
        <Name>App with several in-app products</Name>
        <Description>Sample app for demonstrating an expiring in-app product and a consumable in-app product</Description>
        <Price>0.00</Price>
        <CurrencySymbol>£</CurrencySymbol>
      </MarketData>
    </App>
    <Product ProductId="MORE\_CASH\_1000" LicenseDuration="0" ProductType="Consumable">
      <MarketData xml:lang="en-gb">
        <Name>Consumable Item</Name>
        <Price>0.99</Price>
        <CurrencySymbol>£</CurrencySymbol>
      </MarketData>
    </Product>
  </ListingInformation>
  <LicenseInformation>
    <App>
      <IsActive>true</IsActive>
      <IsTrial>false</IsTrial>
    </App>
  </LicenseInformation>
  <!--
  <ConsumableInformation>
    <Product ProductId="MORE\_CASH\_1000" TransactionId="00000001-0000-0000-0000-000000000000" Status="Active" />
  </ConsumableInformation>
  -->
</CurrentApp>
It looks a lot like the MS example, with a few key differences: firstly, it only contains a single consumable; second, it’s in GBP; and thirdly, the “ConsumableInformation” is commented out. The single consumable is just because that’s what I’m working with, but the other two burnt me:
-
If you change the language or currency, you need to be consistent. I left an en-us in and it, point blank, refused to read the document. I spent a while checking the XML was the correct format, and finally just guessed at this.
-
The ConsumableInformation node is commented out. If you put it in, then when you read the license, it will tell you that it is unfulfilled. This is definitely useful for testing, but looks like a bug in your code if you don’t know this.
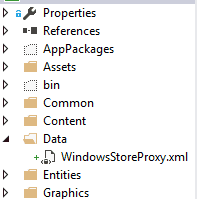
Store this in a Data folder within the project:
Step 2 - Create a helper class for managing the purchase
Obviously, this isn’t a requirement; but I would create a class for each consumable purchase. If you have common code then create a helper and base class as well.
namespace BetRaces.Purchases
{
    public class Purchase
    {
        public const string MORE\_CASH\_PRODUCT = "MORE\_CASH\_1000";
        public const int MORE\_CASH\_AMOUNT = 1000;
The following steps are building on the existence of such a class.
Step 3 - Create a dictionary of purchased GUIDs
The idea here is that you can track what has been bought.
private Dictionary<string, List<Guid>> grantedConsumableTransactionIds;
Step 4 - Grant Feature Locally
If you read the linked documents, they suggest a version of this function; basically, you need a function that will perform the task that you’ve asked for. In this case, it will manage the purchase of the coins, time, bonus, whatever. The following code is pretty much an exact duplicate of that offered by MS:
        private async void GrantFeatureLocally(string productId, Guid transactionId)
        {
            if (grantedConsumableTransactionIds == null)
                grantedConsumableTransactionIds = new Dictionary<string, List<Guid>>();

            if (!grantedConsumableTransactionIds.ContainsKey(productId))
            {
                grantedConsumableTransactionIds.Add(productId, new List<Guid>());
            }
            grantedConsumableTransactionIds[productId].Add(transactionId);

            // Grant the user their content. You will likely increase some kind of gold/coins/some other asset count.
            App.settings.CashPot.Total += MORE\_CASH\_AMOUNT;
            App.settings.SaveSettings();  // Ensure that the purchase is saved before reporting it as successful.
            FulfillmentResult result = await CurrentAppSimulator.ReportConsumableFulfillmentAsync(MORE\_CASH\_PRODUCT, transactionId);

        }
Step 5 - Get Unfulfilled Consumables
The reasoning here is that you have started to make a purchase, but the line above `ReportConsumableFulfillmentAsync` has not been called. This then sits in a status which blocks future purchases.
        private async Task GetUnfulfilledConsumables()
        {
            var products = await CurrentAppSimulator.GetUnfulfilledConsumablesAsync();

            foreach (UnfulfilledConsumable product in products)
            {
                GrantFeatureLocally(product.ProductId, product.TransactionId);
            }
        }
Obviously, there is a risk that the code in step 4 will crash just at the point before you report the fulfilment; however, I’d rather that, than the user having paid for something they haven’t received.
Step 6 - Purchase
The next stage is a RequestProductPurchase() method; here’s the code:
        public async Task<bool> RequestProductPurchase(string productId)
        {
            Uri uri = new Uri("ms-appx:///Data/WindowsStoreProxy.xml");
            Windows.Storage.StorageFile storeProxy = await StorageFile.GetFileFromApplicationUriAsync(uri);

            await CurrentAppSimulator.ReloadSimulatorAsync(storeProxy);

            Guid product1TempTransactionId;

            PurchaseResults purchaseResults = await CurrentAppSimulator.RequestProductPurchaseAsync(productId);
            if (purchaseResults == null) return false;

            switch (purchaseResults.Status)
            {
                case ProductPurchaseStatus.Succeeded:
                    product1TempTransactionId = purchaseResults.TransactionId;

                    // Grant the user their purchase here, and then pass the product ID and transaction ID to currentAppSimulator.reportConsumableFulfillment
                    // To indicate local fulfillment to the Windows Store.
                    GrantFeatureLocally(productId, product1TempTransactionId);
                    return true;

                case ProductPurchaseStatus.NotFulfilled:
                    product1TempTransactionId = purchaseResults.TransactionId;

                    // First check for unfulfilled purchases and grant any unfulfilled purchases from an earlier transaction.
                    await GetUnfulfilledConsumables();

                    // Once products are fulfilled pass the product ID and transaction ID to currentAppSimulator.reportConsumableFulfillment
                    // To indicate local fulfillment to the Windows Store.
                    if (grantedConsumableTransactionIds != null && grantedConsumableTransactionIds.ContainsKey(productId))
                        return true;
                    return false;
            }

            return false;
        }
The above code is what I was referring to in Step 1, when I mentioned the NotFulfilled return status.
Step 7 - Test the change
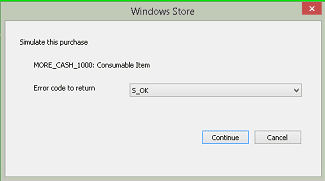
When you try to make a purchase, you should see a screen such as this:
You can then test possible eventualities.
Step 8 - Enable them in the store
The next step is to enable your purchases in the App Store. The code has to be the same; and for larger games (the producers of which will probably not be reading posts such as this) the codes will be generated on a server, so they can manage special offers, etc. centrally.
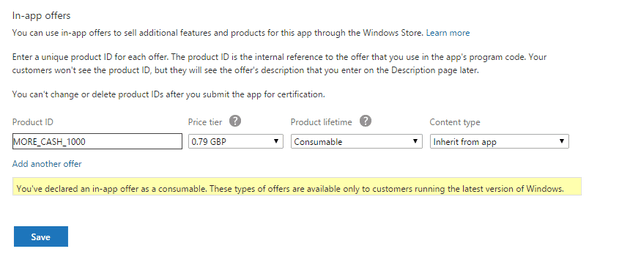
In the Services section of the dashboard:
Now enter your offer code, along with the price and make it a “Consumable”:
Step 9 - The Old Switcheroo
All you need to do now is to substitute CurrentAppSimulator for CurrentApp.
Because both classes are static, I couldn’t find a better way than this:
#if DEBUG
            PurchaseResults purchaseResults = await CurrentAppSimulator.RequestProductPurchaseAsync(productId);
#else
            PurchaseResults purchaseResults = await CurrentApp.RequestProductPurchaseAsync(productId);
#endif
Windows Store Apps automatically compile in Release mode for the store.
Once you’ve found all the CurrentAppSimulator references and replaced them with this conditional construct (by my count there are 4 places for this); you should see the following when you try to make the purchase:
Conclusion
The links at the start are by far the best resource available for this; but hopefully this will fill in a couple of the gaps that tripped me up.


