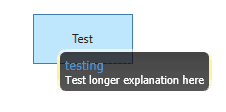
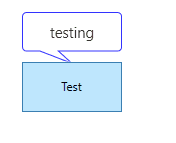
I recently tried to introduce a concept of a tooltip that appeared as a speech bubble; that is, a box that has a pointer to the originating control.
Standing on the Shoulders of Giants
The following is a rundown of links that I used extensively during this investigation:
http://jobijoy.blogspot.co.uk/2008/12/xaml-balloon-comments-expression-blend.html
http://stackoverflow.com/questions/11446250/how-to-style-wpf-tooltip-like-a-speech-bubble
http://stevenhollidge.blogspot.co.uk/2012/04/custom-tooltip-and-popup.html
Possible Approaches
In investigating this, I created four separate projects; these essentially boiled down to three different approaches: 1. A styled tooltip with no arrow
2. A tooltip using the Expression Blend "Callout" method3. A styled tooltip using the "PathGeometry" to define a pointer(1) had the advantage that it looked much better, but doesn’t have a concept of an arrow to the source control. (2) was by far the easiest, but the arrow style makes it look a bit like a cartoon.
In the end I opted for (3), the solution looks a little like this:
    <Window.Resources>
        <LinearGradientBrush x:Key="LightBrush" StartPoint="0,0" EndPoint="0,1">
            <GradientBrush.GradientStops>
                <GradientStopCollection>
                    <GradientStop Color="#FFF" Offset="0.0"/>
                    <GradientStop Color="#EEE" Offset="1.0"/>
                </GradientStopCollection>
            </GradientBrush.GradientStops>
        </LinearGradientBrush>

        <SolidColorBrush x:Key="SolidBorderBrush" Color="#888" />

        <Style x:Key="{x:Type ToolTip}" TargetType="ToolTip">
            <Setter Property="OverridesDefaultStyle" Value="true" />
            <Setter Property="HorizontalOffset" Value="0" />
            <Setter Property="VerticalOffset" Value="0" />
            <Setter Property="Background" Value="GhostWhite" />
            <Setter Property="Foreground" Value="Gray" />
            <Setter Property="FontSize" Value="12" />
            <Setter Property="FontFamily" Value="Segoe UI" />
            <Setter Property="Template">
                <Setter.Value>
                    <ControlTemplate TargetType="ToolTip">
                        <Canvas Width="200" Height="100">
                            <Path x:Name="Container"
                          Canvas.Left="0"
                          Canvas.Top="0"
                          Margin="0"
                          Data="M 50,10 L60,0 L70,10 L100,10 L100,100 L0,100 L0,10 L50,10"
                          Fill="{TemplateBinding Background}"
                          Stroke="Black">
                                <Path.Effect>
                                    <DropShadowEffect BlurRadius="10"
                                              Opacity="0.5"
                                              ShadowDepth="4" />
                                </Path.Effect>
                            </Path>
                            <TextBlock Canvas.Left="50"
                               Canvas.Top="28"
                               Width="100"
                               Height="65"
                               Text="{TemplateBinding Content}"
                               TextWrapping="Wrapwithoverflow" />
                        </Canvas>
                    </ControlTemplate>
                </Setter.Value>
            </Setter>
        </Style>
You can style the bubble a bit:
        <LinearGradientBrush x:Key="LightBrush" StartPoint="0,0" EndPoint="0,1">
            <GradientBrush.GradientStops>
                <GradientStopCollection>
                    <GradientStop Color="#FFF" Offset="0.0"/>
                    <GradientStop Color="#EEE" Offset="1.0"/>
                </GradientStopCollection>
            </GradientBrush.GradientStops>
        </LinearGradientBrush>

        <SolidColorBrush x:Key="SolidBorderBrush" Color="#888" />

        <Style x:Key="{x:Type ToolTip}" TargetType="ToolTip">
            <Setter Property="OverridesDefaultStyle" Value="true" />
            <Setter Property="HorizontalOffset" Value="-50" />
            <Setter Property="VerticalOffset" Value="0" />
            <Setter Property="Background" Value="#BE1C1C1C" />
            <Setter Property="Foreground" Value="Gray" />
            <Setter Property="FontSize" Value="12" />
            <Setter Property="FontFamily" Value="Segoe UI" />
            <Setter Property="Template">
                <Setter.Value>
                    <ControlTemplate TargetType="ToolTip">
                        <Canvas Width="200" Height="100">

                            <Path x:Name="Container"
                          Canvas.Left="0"
                          Canvas.Top="0"
                          Margin="0"
                          Data="M 50,10 L60,0 L70,10 L200,10 L200,100 L0,100 L0,10 L50,10"
                          Stroke="Black">
                                <Path.Effect>
                                    <DropShadowEffect BlurRadius="10"
                                              Opacity="0.5"
                                              ShadowDepth="4" />
                                </Path.Effect>
                                <Path.Fill>
                                    <LinearGradientBrush EndPoint="0.5,1" StartPoint="0.5,0">
                                        <GradientStop Color="#CF181818" Offset="0"/>
                                        <GradientStop Color="#BE1C1C1C" Offset="1"/>
                                    </LinearGradientBrush>

                                </Path.Fill>
                            </Path>
                            <TextBlock Canvas.Left="50"
                               Canvas.Top="28"
                               Width="100"
                               Height="65"
                               Text="{TemplateBinding Content}"
                               TextWrapping="Wrapwithoverflow" />
                        </Canvas>
                    </ControlTemplate>
                </Setter.Value>
            </Setter>
        </Style>
I then looked into the concept of centring the arrow, the following links looked like they might help:
http://www.blackwasp.co.uk/WPFPathMarkupsyntax.aspx
And I did try expanding the syntax:
                                <Path.Data>
                                    <PathGeometry>
                                        <PathGeometry.Figures>
                                            <PathFigureCollection>
                                                <PathFigure IsClosed="True" StartPoint="{Binding RelativeSource={RelativeSource TemplatedParent}, Converter={StaticResource ControlToCentreConverter}}">
                                                    <PathFigure.Segments>
                                                        <PathSegmentCollection>
                                                            <LineSegment Point="60,0"/>
                                                            <LineSegment Point="70,10"/>
                                                            <LineSegment Point="200,10"/>
                                                            <LineSegment Point="200,100"/>
                                                            <LineSegment Point="0,100"/>
                                                            <LineSegment Point="0,10"/>
                                                        </PathSegmentCollection>
                                                    </PathFigure.Segments>
                                                </PathFigure>
                                            </PathFigureCollection>
                                        </PathGeometry.Figures>
                                    </PathGeometry>
The idea was to bind the line segments. I’m not saying it’s not possible; it clearly is, but it started to get prohibitively complex. If anyone comes up with a simple way of doing this (or even a complex one) then please add a link in the comments.


