Some time ago I wrote this post on creating a message on the Service Bus. However, with .Net Core comes a new way of doing things. In fact, the new method has a lot to be said for it; but it is very different.
Azure CLI
If you’ve had a peek at the link above, you’ll see it’s festooned with screenshots - there’ll be a lot fewer in this post, as I’ll be using the Azure CLI. You can install this separately, but once you’ve done so, I heartily recommend downloading the Windows Terminal.
To log-in to the Azure CLI, simply type:
az login
In Powershell (ideally using Windows Terminal, but if you choose to use a Powershell console then… well, there’s just no talking to some people!)
Create a Namespace and Resource Group (or vice-versa)
As with the previous post, we’ll need a namespace to use Service Bus; let’s create one is the CLI:
az servicebus namespace create --resource-group MyResourceGroup --name MyFunkyNS --location ukwest
So, MyResourceGroup is a resource group; you can create this in the Portal, or use the following command:
az group create -l ukwest -n MyResourceGroup
This will create the resource group in the location (-l) of ukwest and will be named (-n) MyResourceGroup. ukwest happens to be the closest location to me. At the time of writing, my figures are showing that you’re almost three time more likely to be from the USA than the UK and twice as likely to be from India if you’re reading this. You should definitely not pick ukwest if you’re not from the UK.
At any time, you can see what you’re doing (or at least the results of what you’re doing) by just loading the portal, but creating resources this way means that they can go into a script.
Now that you’ve created the namespace, you’ll need a connection string: you can get this using the following command:
az servicebus namespace authorization-rule keys list --resource-group MyResourceGroup --namespace-name
MyFunkyNS --name RootManageSharedAccessKey --query primaryConnectionString --output tsv
This should give you the connection string.
Creating the Queue
In the above linked post, creating the queue in code was trivial - there was simply a method on the library that allowed you to create a queue. Whilst convenient, this was possibly misplaced; the management of the namespace has now been moved to a separate library. For the purpose of this post, we’ll just create the queue using the CLI:
az servicebus queue create --resource-group MyResourceGroup --namespace-name MyFunkyNS --name MyQueue
This gives you a queue, so now we can write some code to create a message.
Writing to the Queue
Your first step is to install the library Microsoft.Azure.ServiceBus:
Install-Package Microsoft.Azure.ServiceBus
The code looks like this:
var queueClient = new QueueClient(ConnectionString, "MyQueue");  // ConnectionString is taken from above - just above the title 'Creating the Queue'

var message = new Message(Encoding.UTF8.GetBytes(messageBody));

await queueClient.SendAsync(message);
await queueClient.CloseAsync();
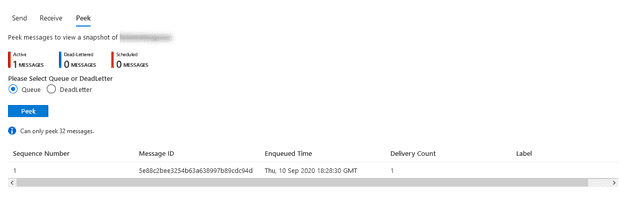
What’s really good is that there is now a Service Bus Explorer, which means you can look at the messages:
Summary
At first glance, the new library seems more complex than the old Framework library; but when you delve into it, it actually makes much more sense. I’ll try to cover the management API in a future post.
